
If you want your hardwood floors to stay smooth and scratch free, you need the right vacuum, the right settings, and a gentle approach. First, clear small items and loose grit so you do not drag debris across the wood. Then use a bare floor attachment or soft roller, switch off the brush roll, and vacuum in slow, overlapping passes. After you cover the open floor, give the edges, seams, and pet hair extra attention. That is where the real difference begins to show.
Prep Hardwood Floors Before Vacuuming
Before you turn on the vacuum, take a few minutes to clear the floor so dirt doesn’t get dragged across the wood. Pick up stones, crumbs, and other loose debris by hand first, because that simple habit protects the finish and improves pickup right away.
Next, gather toys, cords, pet bowls, and anything else that blocks your path. If dust looks heavy, sweep or wipe corners and edges with a microfiber cloth so you don’t push buildup around later.
Then move light furniture, such as a chair or small table, so you can clean the spaces your household uses every day. As you prep, you create a smoother routine that helps your floors stay beautiful and makes your home feel cared for, welcoming, and ready for everyone who walks in.
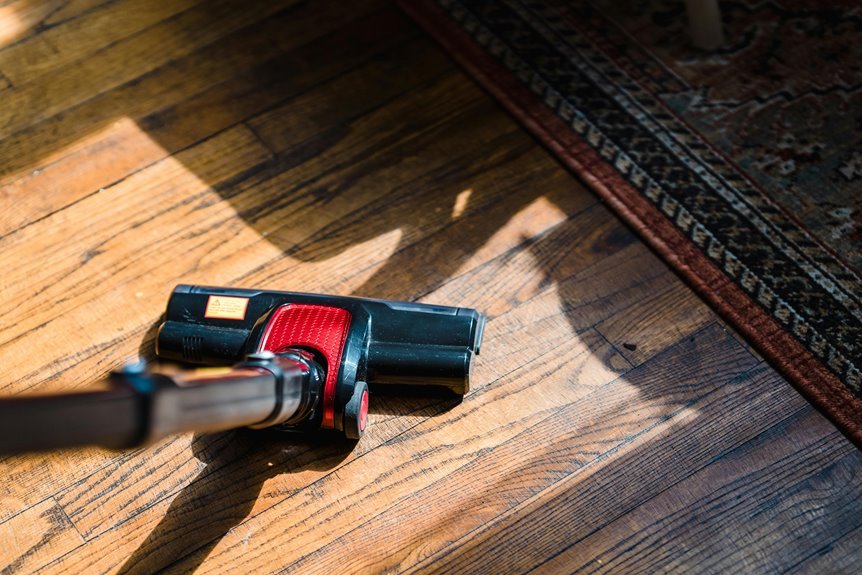
Choose a Vacuum Safe for Hardwood Floors
A good vacuum can make hardwood care much easier, and it helps protect a floor you have worked hard to keep looking nice. When choosing one, look for a bare floor attachment or a soft roller that treats wood gently. Avoid vacuums with stiff heads that can scuff the finish and leave your room looking worn.
As you compare models, check the vacuum’s weight so it feels easy to carry, steer, and use often. A lighter machine makes regular cleaning easier, which helps many homeowners keep floors in good condition.
Also look for adjustable suction and a strong filtration system. These features help remove fine dust without sending it back into the air. With the right vacuum, your home stays cleaner, more comfortable, and welcoming every day.
Use Hardwood-Safe Vacuum Settings
Two settings matter most whenever you vacuum hardwood floors: hard floor mode and brush roll off. As soon as you enable hard floor mode, your vacuum shifts into a gentler, wood-friendly setup. Then adjust suction so dust lifts cleanly without putting unnecessary strain on delicate areas. You are not guessing, you are using settings that help protect your floors and keep your home looking its best.
| Setting | What it does |
|---|---|
| Hard floor mode | Softens contact for wood |
| Brush roll off | Stops harsh spinning bristles |
| Low to medium suction | Lets you adjust suction safely |
| Bare floor head | Keeps pickup smooth and controlled |
If your vacuum offers multiple levels, start low, then increase only as needed. This simple habit helps you clean with confidence every time.
Vacuum Hardwood Floors Without Scratching
To vacuum hardwood floors without scratching them, use the right combination of a soft brush and safe vacuum settings.
Choose a soft bristle or soft roller attachment, because it lifts dust gently instead of dragging grit across the finish.
Keep the brush roll off and select hard floor mode so your vacuum cleans effectively without putting your floors at risk.
Choose A Soft Brush
Because hardwood shows even small scratches, choose a vacuum head with soft bristles or a soft roller instead of a stiff plastic nozzle or a spinning beater bar. This helps clean gently while protecting the floor’s finish.
A soft bristle attachment is a practical choice for hardwood. It glides more smoothly, lifts dust effectively, and feels safer to use in busy family spaces.
| Option | Feels Like | Best For |
|---|---|---|
| Soft bristle brush | A light sweep | Daily dust |
| Soft roller | A smooth touch | Fine debris |
| Stiff nozzle | Too harsh | Avoid on wood |
Also, check the edges of the attachment. If they feel rough, skip it. Choose tools that protect your floors and support regular care.
Use Proper Vacuum Settings
Upon switching to the right vacuum settings, hardwood floors get clean without paying the price in scratches. Start with hard floor mode, since it reduces harsh brush contact and helps your vacuum glide safely. Then turn the brush roll off. That small change keeps bristles from scuffing the finish or flinging grit around your space.
Next, focus on suction calibration. You don’t need maximum power to clean effectively. Lower, steady suction often lifts dust just fine, especially on delicate boards and older finishes. Make a careful floor mode adjustment before each room, because wood can vary.
If your vacuum offers a bare floor attachment or soft roller setting, use it. These settings work together, so you can clean with confidence and keep your home looking well cared for every day.
Clean Dust From Edges and Seams
Start with the edges and seams, because fine dust and grit tend to collect there and can slowly wear down the finish. Use the crevice tool to clean along seams, then move it slowly along plank lines and into corners. This step does more than remove debris. It helps protect the floor from everyday wear.
| Spot | What you see | What you do |
|---|---|---|
| Baseboards | Soft gray lines | Use steady suction along the baseboards |
| Plank seams | Fine grit settled deep | Follow the grain slowly |
| Corners | Small dust buildup | Angle the tool carefully |
Lower the suction if a seam appears delicate, and overlap each pass. If buildup is heavy, loosen it first with a microfiber cloth. This helps the vacuum lift the dust instead of pushing it around.
Vacuum Pet Hair From Hardwood Floors
After you clear dust from edges and seams, shift your focus to pet hair, since it clings to plank lines, gathers under furniture, and seems to show up again five minutes later. For easier pet hair removal, use your vacuum’s bare-floor attachment or a soft roller, then move with the grain in slow, overlapping passes. This helps lift fur from seams without scattering it around.
If you share your home with pets, you’re not alone, and your floors can still feel welcoming. Guide the vacuum under chairs, along baseboards, and around table legs where tumbleweeds collect.
In homes with shedding pets, frequent passes support allergy control by removing dander before it settles. Because fur gathers quickly, lower suction on delicate spots and keep moving steadily, so every room feels cleaner, calmer, and more like yours.
Avoid Common Hardwood Vacuuming Mistakes
You can prevent a lot of hardwood damage by using the right floor attachment, turning the brush roll off, and checking your vacuum before each pass.
If you use a soft bare-floor tool instead of a stiff head, you’ll protect the finish and remove dust more gently. It’s also important to make sure the wheels are free of grit and hair, because trapped debris can scratch the floor when you least expect it.
Choose The Right Attachment
Because hardwood shows every scuff, the attachment you use on your vacuum matters more than most people realize. To keep your floors looking their best, choose soft attachments made for bare surfaces. They glide gently, lift dust effectively, and help you clean with confidence every time.
| Attachment | Best use |
|---|---|
| Soft floor head | Daily dust and crumbs |
| Crevice tools | Along baseboards and corners |
Next, inspect the edges of each tool before you begin. Look for smooth surfaces, no rough plastic, and no trapped debris. Hard floor attachments are the safest choice for everyday cleaning, especially when you want consistent pickup without extra effort. Crevice tools help you reach tight spots your main head can miss, so the whole room feels clean, polished, and well cared for.
Avoid Brush Roll Damage
While hardwood can handle regular vacuuming, a spinning brush roll can cause quiet damage quickly if you leave it on. On wood, that rotating bar can scatter grit, scrape the finish, and rough up delicate boards before you notice. To stay safe, switch to hard floor mode or turn the brush roll off every time you clean.
That simple habit works even better with proper brush roll maintenance. Check for tangled hair, trapped lint, or stuck grit, because buildup makes the roller drag harder across the floor.
For effective bristle wear prevention, replace worn or stiff bristles before they start acting like sandpaper. If your vacuum offers adjustable suction, lower it for fragile areas. You aren’t being overly careful. You’re protecting the floors that make your home feel welcoming every day.
Check Wheels For Debris
Brush roll settings matter, but the wheels deserve equal attention because they contact the floor on every pass. When debris builds up on the wheels, small particles of grit can act like sandpaper under the vacuum. Even with the brush roll turned off, that buildup can scratch the finish. Before you start cleaning, gently tilt or flip the vacuum and inspect the wheels closely.
| Check | What to spot | Why it matters |
|---|---|---|
| Front wheels | Hair and lint | Helps prevent dragging |
| Rear wheels | Grit and crumbs | Helps prevent scratches |
| Axles | Wrapped fibers | Keeps wheels rolling smoothly |
| Housing edges | Stuck dust | Reduces scuffing |
| After use | New buildup | Supports regular wheel maintenance |
A quick wipe or careful removal with tweezers helps keep each pass safer and smoother.
Keep Hardwood Floors Clean Between Vacuuming
Between vacuuming sessions, keep hardwood floors looking clean by stopping grit and dust before they spread. Start with simple daily dust control that fits your routine. Place doormats at each entrance, ask family members to leave shoes by the door, and shake out rugs often. These small steps help everyone protect the floors together.
Next, make scratch prevention part of the day. Wipe up spills right away, because moisture and dirt can quickly dull the finish. Use a microfiber dust mop for quick touch-ups in high-traffic areas like hallways, kitchens, and entryways. If you notice crumbs or grit, pick them up manually instead of grinding them into the floor.
You can also check pet paws, keep nails trimmed, and move chairs gently. Your floors stay cleaner, and your home keeps a welcoming, well-cared-for feel.
Frequently Asked Questions
Can Robot Vacuums Safely Clean Hardwood Floors Every Day?
Yes, absolutely. They are a great option for hardwood when you use hard floor settings and turn the brush roll off. This helps protect floors, supports daily vacuuming habits, and improves pet hair pickup while keeping your home feeling welcoming.
How Often Should Hardwood Floors Be Professionally Refinished?
You should typically refinish hardwood floors every 7 to 10 years, but the right schedule depends on wear, foot traffic, pets, and routine care. It is usually time to refinish when scratches become more noticeable, the finish starts to fade, or the wood appears dry and worn.
What Humidity Level Helps Protect Hardwood Floors From Damage?
You’ll protect hardwood best by keeping your home within the ideal humidity range of 35% to 55%. Use seasonal moisture control, such as humidifiers or dehumidifiers, to help your floors stay stable, attractive, and part of a welcoming home.
Are Steam Cleaners Safe to Use on Sealed Hardwood Floors?
No, you should not use steam cleaners on sealed hardwood floors. To protect steam safety, avoid excess heat and moisture, because steam can seep into seams and weaken the finish. This helps protect your floors and keeps them looking beautiful.
How Can I Reduce Static Dust Buildup on Hardwood Floors?
You can reduce static dust buildup by focusing on static control and dust prevention. Vacuum frequently with a soft attachment, use doormats and rugs, keep indoor humidity balanced, and wipe floors with a barely damp microfiber cloth.
