
What you might not know is that a packed brush roll can quietly strain your vacuum motor long before suction drops. If your vacuum leaves crumbs behind, sounds harsher than usual, or scatters pet hair instead of lifting it, a careful brush roll cleaning will often solve the problem. First, unplug the vacuum, remove the roller safely, clear away wrapped hair and lint, wipe the housing and end caps, and reinstall everything correctly. One small detail can determine whether it spins smoothly or starts fighting you again.
Know What Clogs a Brush Roll
Why does a vacuum brush roll get jammed so fast? You aren’t doing anything wrong. In many homes, the roller handles the same types of debris every day, so this is a common issue. The most frequent clog sources are long hair, pet fur, carpet fibers, string, and dusty lint. These materials wrap around the roller, catch in the bristles, and tighten with each pass.
Once that process begins, debris buildup patterns become easier to identify. Heavier material often collects near the roller ends, around seams, and along grooves where strands get trapped first. Fine dust then sticks to that layer and turns a small tangle into a stubborn clog. If your floors shed heavily, or if your home has pets and rugs, your brush roll works harder and clogs faster than expected on most days.
Spot Signs the Brush Roll Needs Cleaning
Even though your vacuum still turns on, the brush roll often gives clear warning signs when it needs attention. You might notice weaker performance on carpet, scattered crumbs left behind, or hair that stays put no matter how slowly you vacuum. Sometimes the first clue is an unusual noise, such as tapping, rattling, or a strained whir.
| Sign | What you notice | What it suggests |
|---|---|---|
| Weak pickup | Dirt stays behind | Wrapped debris |
| Loud operation | Unusual noise grows | Buildup or jams |
As you continue cleaning, your vacuum may feel harder to push, especially on rugs. You may also notice a dusty smell or see the brush roll stop spinning smoothly. These signs are common, so there is no need to worry. You are simply noticing when your vacuum needs a little care.
Gather Your Cleaning Tools
Before you start, gather the basic tools so you can clean the brush roll efficiently and without guesswork.
You’ll need scissors or a seam ripper, tweezers, a soft brush or old toothbrush, a cloth, and a small container for screws and clips.
For safety, unplug the vacuum first. Keep gloves nearby if you prefer not to handle packed-in hair and dust directly.
Essential Cleaning Supplies
A few simple tools can make brush roll cleaning much easier and far less frustrating. When you gather the right supplies and tools at the start, the job feels more manageable. That small step helps you work efficiently and avoid interruptions.
| Tool | Best use |
|---|---|
| Scissors or seam ripper | Cut wrapped hair and threads |
| Tweezers or hook tool | Lift stubborn debris from grooves |
| Soft brush or toothbrush | Loosen dust from bristles and seams |
| Damp microfiber cloth | Wipe away fine dirt and residue |
With these basic items nearby, you can remove buildup without guesswork. You do not need a large kit, just a few reliable tools that work well together. With the right setup, you can clean faster, protect the brush roll, and keep the task simple and manageable.
Safety Gear Needed
Because brush-roll cleaning brings your hands close to sharp edges, dusty buildup, and small fasteners, gather a few basic safety items before you begin. Start with protective gloves so you can handle hair clumps, screws, and rough plastic without nicking your skin. Add safety goggles to protect your eyes from dust, grit, and loose fibers that may spring up while you work.
Next, keep a small dish or magnetic tray nearby for screws and clips, because losing tiny parts can quickly slow the job. If you’re sensitive to dust, wear a simple face mask for added comfort. Before touching any part of the vacuum, turn it off and unplug it.
Then check the manual if the brush roll opening looks unfamiliar. This will help you work with confidence and stay organized throughout the process.
Unplug the Vacuum First
Although it may feel like a small step, unplugging the vacuum first helps protect you while you work around the brush roll. Before touching anything underneath, switch the vacuum off and pull the plug from the outlet. This simple habit supports power cord safety and electrical hazard awareness, helping you feel confident and prepared during routine home care. You are not being overly careful. You are being smart.
| Step | What you do | Why it matters |
|---|---|---|
| 1 | Turn vacuum off | Stops sudden movement |
| 2 | Unplug cord fully | Cuts electric flow |
| 3 | Check plug stays out | Prevents accidental startup |
Next, place the cord where it will not slip back toward the outlet. If others are nearby, let them know you are cleaning the vacuum so everyone stays safe.
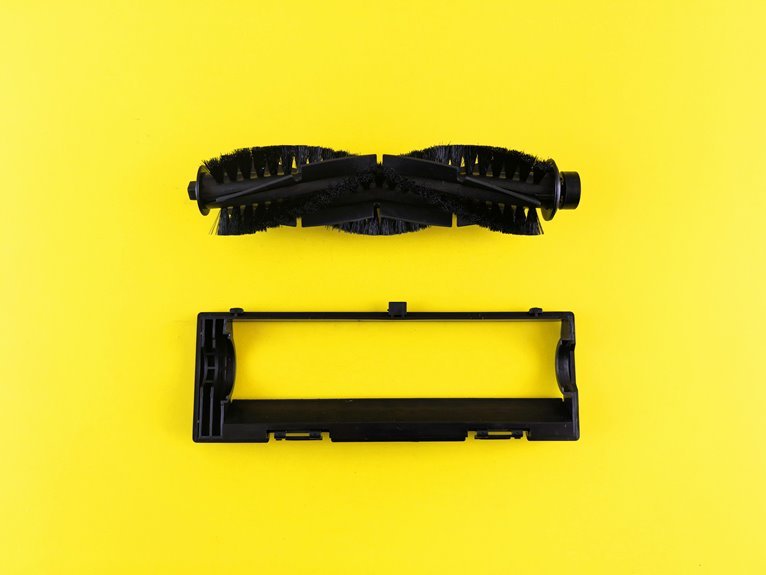
Remove the Brush Roll Safely
Now that the vacuum is unplugged, turn it over and locate the brush roll cover on the underside.
Open the cover by removing the screws, clips, or latches used on your model, and place those small parts in one secure spot so they don’t get lost.
Then lift the brush roll out slowly and carefully so you don’t bend the bristles or disturb the belt.
Unplug And Prepare
Unplug and Prepare
Before touching the brush roll, turn off the vacuum and unplug it. This helps you work safely and with less stress. Next, set up your workspace. Check the power cord for frays, bent prongs, or dust near the plug. Then inspect the vacuum to locate the brush roll, which is usually underneath the unit.
| Step | What you do | Why it helps |
|---|---|---|
| 1 | Unplug vacuum | Protects you |
| 2 | Check cord | Prevents surprises |
Place the vacuum on a flat surface with good lighting. Keep a small dish nearby for screws or clips so nothing gets lost and you stay organized. If your model looks unfamiliar, open the user manual before continuing.
Release Roller Cover
Once the vacuum is unplugged and resting securely on a flat surface, turn it over and open the roller cover carefully so you can reach the brush roll without forcing any parts. Check your manual first, especially if your model uses unusual fasteners or hidden tabs that may be difficult to spot.
Next, inspect the base closely to identify the type of cover latches your vacuum uses. You may find screws, clips, sliding locks, or snap tabs.
During access panel removal, loosen each part gently and place small pieces in a bowl or tray. This helps keep everything organized. If a latch resists, stop and check the release point again instead of prying. Careful handling protects the housing and makes the job easier.
Lift Out Carefully
With the cover removed, lift the brush roll out gently by both ends and ease it straight from the housing. Keep a steady grip and don’t yank it. Careful lifting helps protect the bristles, end caps, and belt area from damage. If the roller feels stuck, stop and check for clips, belt tension, or hidden debris before trying again.
Continue by guiding the brush roll upward in a controlled motion and keep it level so parts don’t shift or come loose. Set screws and clips aside where your household team can find them later.
If a belt loops around one end, slide it off slowly instead of pulling hard. This kind of careful maintenance helps keep your vacuum working well and makes it easier for everyone at home to maintain cleaner floors with less frustration.
Cut Away Tangled Hair
Start by cutting through the hair and thread wrapped around the brush roll, because pulling it off first can tug on the bristles and make the mess worse. Use small scissors, a seam ripper, or a hook tool, then follow the roller grooves so you can lift trapped strands cleanly. These hair cutting tips help you work safely and stay in control.
| Tool | Best use |
|---|---|
| Scissors | Snip wrapped hair |
| Seam ripper | Slide under tight loops |
| Hook tool | Lift embedded strands |
| Tweezers | Grab stubborn clumps |
| Fingers | Pull loosened debris |
Next, remove the cut material by hand. For tangled fiber removal, work slowly, section by section, so you protect the bristles. Stay patient, and each careful pass helps restore your vacuum’s performance.
Wipe the Roller and Housing
After you’ve pulled away the tangled hair, use a dry soft brush or an old toothbrush to sweep dust from the roller, bristles, and seams. This loosens fine grit without stressing the brush, and it helps you reach tight spots your fingers can’t.
Next, wipe the roller with a slightly damp microfiber cloth. If grime sticks, add a drop of mild soap and rub gently. Then move to the housing and lift dust from corners and edges. You’re not trying to soak anything, just remove the film that keeps your vacuum from feeling fresh.
A simple microfiber wipe routine works well because it lifts residue instead of spreading it around. As you clean, you’ll see your brush roll looking cared for again, like part of a home routine you can feel good about.
Clean the End Caps
Because dirt often collects where the brush roll spins, the end caps deserve a close look before you put everything back together. Gently twist or pull each cap off, if your model allows it, then check for packed lint, hair, and dusty grime around the small inner surfaces.
To clean the end caps effectively, use a dry toothbrush, cotton swab, or soft cloth to loosen buildup without scraping the plastic. If grime remains stuck, lightly dampen the cloth with mild soapy water and wipe carefully. Keep moisture away from enclosed bearings unless your manual says it’s safe.
While cleaning, inspect for rough spinning, wobbling, or sticky residue, since these signs can indicate needed bearing maintenance. Taking a few extra minutes here helps your vacuum remain a dependable part of your home cleaning routine.
Reinstall the Brush Roll Correctly
Now that the end caps are clean, reinstall the brush roll with confidence. Align the end caps correctly, then secure the belt so it fits snugly and stays straight.
Before closing the vacuum, rotate the brush roll by hand to confirm that it spins smoothly and doesn’t catch.
Align End Caps Properly
Once the brush roll is clean and fully dry, place it back into the housing with the end caps aligned the same way they were removed. This step is important because proper end cap alignment helps the roller spin freely and maintain a secure fit. If one cap is backward or off center, the brush roll may wobble, drag, or fail to turn.
As you lower the roll into place, confirm that each end sits in its slot without pressure or resistance. Proper seating means the brush roll feels level, stable, and correctly positioned to work with the rest of the vacuum.
You aren’t simply reassembling parts, you’re restoring the machine’s ability to care for your floors. Check both sides one more time and make sure everything matches before you continue.
Seat Belt Securely
With the end caps lined up, the next step is to seat the belt securely so the brush roll can spin properly. Slide the belt onto the motor shaft first, then guide it over the brush roll groove. Keep the belt aligned straight, because a twisted belt can slip or wear out quickly.
As you lower the brush roll into place, hold both ends evenly and make sure it fits snugly in its slots. If your model allows tension adjustment, follow the manual so the belt feels firm, not overstretched.
- You’ll feel more confident when each part fits into place.
- You’re giving your vacuum the same care a good team gives shared tools.
- That small, careful step helps your home feel cleaner, calmer, and ready for everyone.
Test Brush Rotation
Before you close the vacuum, spin the brush roll by hand to test its rotation and confirm that you reinstalled it correctly.
This simple check helps you catch small mistakes before they become larger problems. As you turn it, notice how it feels. It should rotate smoothly and freely, without rubbing, wobbling, or sticking.
If the brush roll resists, stop and inspect the ends, belt placement, and housing grooves. Make sure each end cap is fully seated and the belt runs straight. Then spin it again.
A brush roll that turns easily usually means the parts are aligned correctly and secured properly. This quick test gives you confidence, protects the motor, and helps your vacuum perform reliably every day.
Test the Brush Roll and Suction
After you’ve put the brush roll back in place and secured the cover, plug the vacuum in and test it on a small area to make sure everything moves smoothly. Listen for steady rotation and check that the vacuum pushes easily. Then do a quick suction check by vacuuming crumbs or lint on both carpet and hard flooring. If pickup looks even and strong, your brush performance is back where it should be.
This small test helps you feel confident that your vacuum is ready to be part of your cleaning routine without surprises.
- You’ll feel relieved when the vacuum glides smoothly instead of fighting you.
- You’ll feel proud knowing your care restored strong pickup.
- You’ll feel more connected to your home when clean floors welcome everyone in.
If something sounds rough or pickup seems weak, switch it off and recheck the fit.
Prevent Future Brush Roll Clogs
Even though your brush roll is clean now, a few simple habits can help prevent hair and fuzz from building up again. Start with regular maintenance. After every few uses, turn the vacuum over, check the roller, and remove loose strands before they tighten around it. If you often vacuum pet beds, rugs, or areas with long hair, inspect the brush roll more frequently.
It also helps to prepare the area before vacuuming. Pick up string, socks, and large lint clumps from the floor so the brush roll doesn’t pull them in. Empty the bin regularly and check for clear airflow, since packed debris can force more fuzz into the roller area.
Proper storage matters as well. Keep your vacuum in a clean, dry place and wrap the cord neatly. These small routines can help your machine stay reliable and ready for regular use.
Frequently Asked Questions
How Often Should I Replace the Vacuum Brush Roll?
Replace the vacuum brush roll every 12 to 24 months, although the exact interval depends on how often you vacuum, the type of flooring in your home, and whether you have pets. Regular cleaning can help extend the brush roll’s lifespan. Replace it sooner if the bristles become bent or show signs of wear.
Can a Worn Belt Cause the Brush Roll to Stop Spinning?
Yes, like a tired rubber band, a worn belt can stop your brush roll from spinning. In belt wear diagnosis and brush roll troubleshooting, look for slipping, stretching, cracks, or looseness. This is a common issue.
Is It Safe to Soak a Brush Roll in Water?
Yes, you can soak it, but only if your manual allows it, because brush roll materials vary and water damage can ruin bearings or adhesives. To protect your vacuum, rinse it lightly and let it dry completely first.
How Long Should the Brush Roll Dry Before Reinstalling?
Let the brush roll dry for at least 30 minutes after washing, and do not reinstall it until it is completely dry. Waiting for the proper drying time helps protect your vacuum and keeps it running properly.
Why Does My Vacuum Still Smell After Cleaning the Brush Roll?
Your vacuum still smells because concealed debris, damp parts, or motor odors are lingering, because apparently your vacuum loves souvenirs. Check the housing, belt, filters, and hose, and dry everything fully so your cleaning crew breathes easier together.
