
When your vacuum stops picking up dirt, you do not need to panic or assume it is finished. Start with the simple fixes that often solve the problem quickly: empty the dustbin or replace the bag, make sure each part is securely in place, then check the filter, hose, wand, and floor head for clogs or leaks. Next, adjust the height, remove hair from the brush roll, and inspect the belt. A few small checks can restore performance, and the next step matters.
Empty the Vacuum Bag or Dustbin
Before you dig into hoses or filters, start with the simplest fix: empty the dustbin or replace the vacuum bag. Whenever your vacuum stops picking up dirt, a full container is often the cause. You aren’t doing anything wrong. This happens in busy homes, especially when everyone is tracking in crumbs, pet hair, and lint.
Start with safe dustbin maintenance. Remove the bin, empty the debris into the trash, and wipe the inside so compacted dust doesn’t restrict airflow.
If your model uses a bag, replace it once it feels full or suction drops. Regular bin emptying helps maintain strong suction and keeps your vacuum running efficiently.
While you’re there, make sure the bin, lid, and compartment click fully into place so the machine seals tightly again.
Clean a Clogged Vacuum Filter
If emptying the bin or changing the bag didn’t restore suction, check the filter next. A dirty filter collects fine dust until it restricts airflow, which prevents the vacuum from operating efficiently.
Locate both filters, since many vacuums have a pre-motor filter and a post-motor filter. Remove each one and check the manual before cleaning.
If a filter is washable, rinse it with cool water and let it dry completely, usually for 24 hours. If it isn’t washable, tap it gently to remove loose dust or replace it.
Wipe dust from inside the filter housing as well, so debris doesn’t build up again right away. Regular filter maintenance helps restore suction and keeps the vacuum working properly.
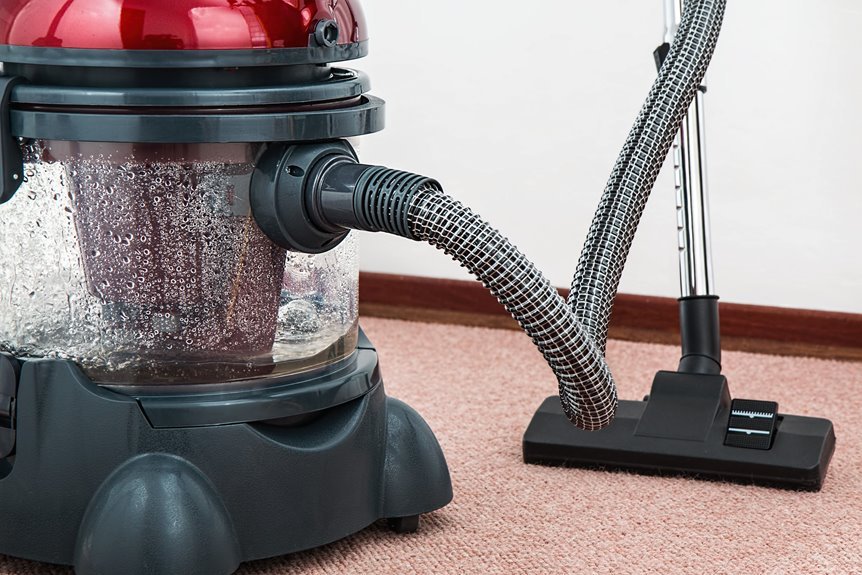
Clear a Blocked Vacuum Hose
If your vacuum still won’t pick up dirt, check both hose openings first, because clogs often hide right at the ends.
Remove any blockage you find by pushing it through carefully, and inspect the wand and floor head as well.
Once the airflow path is clear, reattach the hose securely so you can restore strong suction and get back to cleaning.
Check Hose Openings
Start with the hose openings, because this is where suction often gets choked off fast. Check both ends closely, including where the hose meets the vacuum body and where attachments lock in. Look for packed lint, paper scraps, pet hair, and stuck debris right at the opening. Even a small ring of buildup can reduce airflow more than you might expect.
Next, inspect each connection carefully for air leaks. If a fitting feels loose, suction can fade before dirt ever reaches the bin. Look for hose inlet damage, small splits, warped plastic, or worn seals that prevent parts from fitting tightly.
As you check, you aren’t just fixing a machine. You’re restoring your cleaning routine and helping your home feel under control again today.
Remove Internal Clogs
Once you’ve checked the hose openings, move deeper into the airflow path and clear anything trapped inside the hose, wand, or floor head. Small clogs often hide in bends and joints, where dirt, paper, hair, or a small sock can quickly reduce suction. Detach each piece and look through it toward a light.
Next, clear the blockage gently. Feed a broom handle, long bottle brush, or flexible tool through the hose to push debris out without damaging it.
Then inspect the floor head neck and wand for packed dust in the internal passageways. If needed, drop a coin through to test whether air can pass freely. Restoring a clear path helps motor airflow recover, so your vacuum can perform effectively during every cleaning job.
Reattach Hose Securely
A secure hose connection matters just as much as clearing the clog, because even a small gap can leak air and make your vacuum feel weak again. After you remove the blockage, line up the hose ends carefully and push each fitting in until it clicks or feels snug in place.
Next, give the hose a gentle twist and light tug to confirm a secure connection. If anything feels loose, remove it and try again so your vacuum works like the reliable helper you count on.
While you’re there, inspect the hose seals for dust, cracks, or bent rubber that could let air escape. Wipe the connection points clean, then reattach every piece, including the wand and floor head.
Once everything fits tightly, your vacuum can work with full suction again.
Adjust Vacuum Height for Your Floor
Should your vacuum sound normal but still leave grit behind, the height setting may be the issue. When the base sits too low, it can seal against the surface and restrict airflow. When it rides too high, dirt can escape before suction picks it up. You aren’t doing anything wrong, this is a common issue.
Remove Hair From the Brush Roll
If hair has wrapped around the brush roll, remove the roll safely before it strains the vacuum and reduces pickup.
Cut away the tangled hair and fibers so the brush can spin freely again.
Reinstall the brush roll, then test the vacuum to confirm it’s cleaning the floor properly.
Safe Brush Roll Removal
Before you remove the brush roll, unplug the vacuum and place it upside down on a stable surface. This helps you work safely and makes it easier to see what’s wrapped around the roll.
A careful setup supports brush roll safety and helps you stay in control from the start.
Next, check your manual for clips, screws, or end caps that secure the roll. If your model allows removal, wear protective gloves for better grip and to keep your hands clean.
Loosen the cover carefully, then place small parts in a bowl so they don’t get lost. As you lift out the brush roll, note how the ends fit into the housing. This will help you reinstall it correctly later.
This kind of careful maintenance helps keep your vacuum ready for every floor in your home.
Cut Away Tangled Hair
With the brush roll removed and fully visible, cut away any hair and string that restrict its movement. Use small scissors or a seam ripper, and work slowly so you don’t damage the bristles. As you loosen each strand, pull it free with your fingers and clear debris from every groove along the roller.
Next, inspect both ends of the brush roll, because tangled debris often collects near the end caps and prevents smooth spinning. If dust clumps cling to the surface, wipe them away with a dry cloth. This step is an important part of brush maintenance.
Taking a few careful minutes here does more than restore vacuum performance. It also helps keep your cleaning routine efficient, reliable, and ready for everyday messes.
Reinstall And Test
Now that the hair is cleared, place the brush roll back into its housing and make sure each end sits in the correct slot. Reattach the cover, tighten the screws, and check that nothing is pinched or wobbling. Then give your vacuum a quick power cycle so each part resets cleanly before you test suction on a small patch of carpet.
| Check | What you want |
|---|---|
| Brush roll | Spins freely |
| End caps | Fully seated |
| Cover plate | Snug and even |
| Wheels/nozzle | Clear of debris |
| Suction test | Strong pickup |
As you test, listen for a smooth sound, not grinding. If pickup still feels weak, confirm that the bin is latched, the filters are dry, and the hose seals tightly. You have done the hard part, and your vacuum should feel ready to work again.
Check for a Broken Vacuum Belt
Should the motor run but the vacuum still leaves dirt behind, the belt might be the hidden problem. A broken belt can stop the brush roll from turning, so dirt stays put even when suction sounds normal. This is a common issue, and you can check it calmly.
Start with a quick belt inspection after unplugging the vacuum. Remove the bottom plate and look for a belt that’s snapped, stretched, loose, or slipped off the motor shaft or brush roll. Then spin the brush by hand. If it doesn’t move easily, debris may have strained the belt. Also check for a burnt rubber smell, which often points to belt trouble. Catching this early helps you regain control and keep your cleaning routine running smoothly.
Decide Whether to Repair or Replace
After you’ve checked the belt, step back and evaluate the vacuum as a whole before spending more money on it. You want a fix that makes sense, not one that creates more frustration, so compare repair costs carefully and weigh the vacuum’s age against the cost of replacement.
- Check the vacuum’s age. If it’s close to the end of its expected lifespan, replacement may be the better choice.
- Price the repair. If parts, labor, or several needed fixes cost nearly as much as a new model, it may not be worth repairing.
- Review performance. Weak suction, cracked hoses, failing seals, and motor problems often point to larger issues.
- Consider your home’s needs. If your household cleans frequently, a dependable upgrade may help you manage messes more effectively.
You’re not giving up. You’re making a practical choice that keeps your home running smoothly.
Frequently Asked Questions
Why Does My Vacuum Smell Bad While Running?
Your vacuum smells bad because trapped debris, a clogged filter, a jammed brush roll, or motor trouble can cause a burning dust odor or an electrical overheating smell. You can fix it faster by checking all of these areas together.
Can a Vacuum Lose Suction From Cracked Seals?
Yes, your vacuum can lose suction from cracked seals because airflow leaks reduce pressure throughout the system. Improve performance by inspecting the seals, checking the latches, and reseating compartments so all parts work together properly.
How Often Should Vacuum Filters Be Replaced?
You should replace vacuum filters every 3 to 6 months. For example, if you vacuum weekly and have pets, your vacuum filter may need replacement sooner. Following the recommended replacement schedule and your manufacturer’s guidance helps maintain strong suction.
What Causes a Vacuum Motor to Overheat?
A vacuum motor overheats when airflow is blocked by clogged hoses, dirty filters, full bins, or air leaks. These issues reduce motor cooling and can trigger the thermal cutoff, so check and clean the vacuum promptly.
Why Is My Vacuum Noisy but Not Cleaning?
Your vacuum sounds loud because airflow is blocked or the settings are incorrect. Check for a clogged brush roll, a full bin, dirty filters, hose clogs, leaks, and an incorrect height adjustment so you can get back to cleaning effectively.
