
To keep your vacuum working well and lasting longer, store it in a cool, dry indoor place, such as a closet or utility shelf. Keep it away from steam, heat, direct sunlight, and damp walls. Before storing it, empty the bin or bag, remove hair from the brush roll, clean the filters, wipe down the body, and let all parts dry completely. Then place it upright, wrap the cord loosely, and store the attachments together. Small storage mistakes can quietly shorten its lifespan.
Choose the Best Place for Storage
Choose a cool, dry indoor area for vacuum storage to protect it from moisture, heat, and sudden temperature changes. This simple choice helps keep your vacuum reliable and ready whenever your home needs care. A hallway cabinet, laundry room shelf, or indoor closet often works well.
Avoid basements, attics, garages, and sunny corners, where damp air or harsh temperatures can wear down parts. Choose a spot that’s easy to reach, because storage should support your routine, not complicate it.
If possible, keep the vacuum away from heaters, windows, and damp walls. Look for a cool, dry location with steady conditions and enough room for a comfortable fit. This helps protect your vacuum and keeps it part of an organized home.
Clean the Vacuum Before Storing It
Before storing your vacuum, empty the dust bin or replace the bag so dirt doesn’t remain inside and cause odors or clogs.
Clean the filters thoroughly, then wipe the brush and hose to remove dust, hair, and debris that can wear down parts over time.
Make sure every component is completely dry before putting the vacuum away, because this helps prevent mold, mildew, and musty odors.
Empty The Dust Bin
Always empty the dust bin right after your last cleaning session. Trapped dirt sits inside the vacuum and can lead to bad odors, clogged airflow, and extra mess the next time you use it.
Before you store the vacuum, carry it to a trash can, remove the bin carefully, and dump everything out without shaking dust back into the room.
If your model uses a bag, replace it now so your vacuum is ready when you need it again.
Good dust bin maintenance keeps the machine fresher and helps it perform reliably. Over time, consistent debris disposal habits also make cleanup easier and less unpleasant.
As you finish, check the bin edges for stuck lint or crumbs, then reattach the container securely before putting the vacuum away.
Clean Filters Thoroughly
Since fine dust settles deep inside the vacuum, the filters need just as much attention as the dust bin. After emptying debris, check your manual and remove each filter correctly. Good filter maintenance helps your vacuum stay reliable and ready when you need it.
Next, tap out loose dust outdoors if the manual allows. Wash reusable filters gently with water only, unless the manufacturer instructs otherwise. Let every filter dry completely before reinstalling it, because trapped moisture can cause odors or mildew.
If your vacuum uses disposable filters, replace them before storage so dirt doesn’t harden inside. This simple airflow care protects suction, supports a longer machine life, and helps keep your vacuum easy to use instead of becoming another task to handle later.
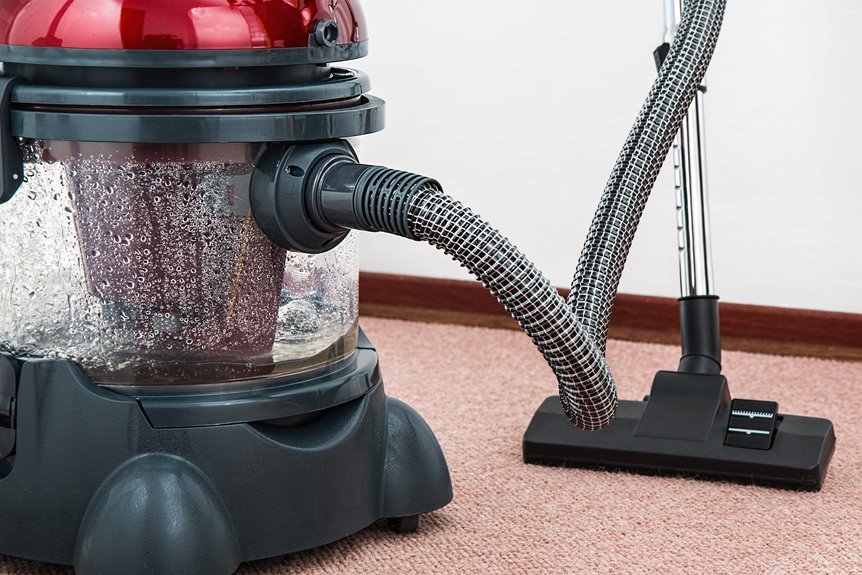
Wipe Brush And Hose
While the filters dry, turn your attention to the brush roll and hose, since these parts often collect hair, lint, and grime that can cause stale odors during storage. Start by unplugging the vacuum and removing tangled strands with scissors or a seam ripper. Then shake out the hose, check for clogs, and wipe inside the opening with a soft cloth.
Next, clean the brush and hose carefully with a damp cloth and warm water, not a soaking wet one. Make sure every part is clean and completely dry before storage so moisture doesn’t get trapped. Finish with an exterior wipe down to remove dust and sticky residue. By caring for these often overlooked parts, you help keep your vacuum fresh, ready to use, and part of a home that feels clean and welcoming for everyone.
Empty the Dust Bin or Bag
Before you store your vacuum, empty the dust bin or replace the bag so dirt doesn’t sit inside and create odors, clogs, or extra strain on the machine. This simple step helps your vacuum stay fresh, reliable, and ready for the next cleanup. It also makes home care feel easier.
For effective dust bin maintenance, empty debris after each use whenever the container looks half full or more. Then check the corners for packed dust and wipe them clean.
If your vacuum uses bags, monitor bag replacement timing closely. Change the bag whenever it feels firm, looks full, or suction starts to drop. Keeping up with this routine protects airflow and helps your vacuum last longer. It’s a small habit, but it keeps your cleaning routine smooth and dependable every week.
Remove Hair From the Brush Roll
After you’ve emptied the dust bin or replaced the bag, take a minute to remove hair from the brush roll so your vacuum doesn’t carry hidden debris into storage. Wrapped strands can trap dust, slow movement, and strain the parts that help keep your home clean.
For proper brush roll maintenance, unplug the vacuum and turn it over carefully. Use scissors, a seam ripper, or another hair removal tool to cut tangled hair along the groove, then pull it away by hand.
If your model allows you to remove the brush roll, slide it out and clean the ends as well, since buildup often collects there. This simple habit helps your vacuum stay ready for the next use and makes your cleaning routine easier and more efficient.
Make Sure the Vacuum Is Dry
Once you’ve cleared hair from the brush roll, check every part of the vacuum for any remaining moisture. A thorough moisture check helps protect a machine your home depends on.
If you washed filters, dustbin parts, or attachments, allow them to dry completely before putting them away, even if they already seem dry.
- Pat surfaces with a clean towel.
- Leave parts separated so air can circulate.
- Check hidden areas near seals and corners.
- Reinstall pieces only when they feel completely dry.
This step matters because trapped dampness can cause odor, mildew, or stuck-on grime. You’re not being overly careful, you’re maintaining a tool that supports your space and your routine.
When drying becomes part of your regular home-care routine, your vacuum stays fresher, cleaner, and ready for everyone in your home.
Wrap the Cord Without Damage
Because the power cord takes daily wear, wrapping it the right way helps keep your vacuum safe and ready to use.
First, unplug it fully and guide the cord into loose, even loops. Don’t wind it tightly around the handle, because that can strain the wires inside and shorten its lifespan.
Instead, use the built-in cord hooks if your model has them. They keep the cord supported, tidy, and easy to access the next time you need it.
For better cord care, smooth out twists as you wrap and leave a little slack near the plug. This simple step helps prevent kinks and stress points.
If your vacuum doesn’t have cord hooks, coil the cord gently by hand and secure it loosely. With a little care, your vacuum can stay dependable and ready for everyday use.
Keep Attachments in One Place
Keep Attachments in One Place
Just as a neatly wrapped cord helps prevent damage, keeping your attachments in one place protects the small tools that improve your vacuum’s performance.
When every piece has a designated spot, you spend less time searching, and your vacuum is easier to use each time.
- Store crevice tools, brushes, and nozzles in a single bag, box, or built-in compartment.
- Group similar pieces together so attachment organization remains simple and manageable.
- Use sturdy accessory storage that protects parts from bumps, dust, and crushing.
- Return each tool after cleaning so your setup stays complete and ready for the next use.
This small habit helps your household stay organized and maintained. You’ll know where everything belongs, and that sense of order can make routine cleaning feel more efficient and coordinated.
Store It Upright if It Locks
Before storing the vacuum, make sure the upright lock clicks firmly into place so it stays secure.
When it locks upright, it takes up less floor space and helps keep the storage area cleaner and easier to use. This also helps prevent tipping damage, keeping the vacuum safer and ready for the next mess.
Check Upright Lock
If your vacuum has an upright lock, engage it and store the machine in an upright position. Before stepping away, confirm that the upright lock clicks securely into place. This quick check helps keep the vacuum stable, balanced, and ready for the next use.
- Test the handle by gently pulling it back.
- Listen for a clear click from the lock.
- Check that the base remains steady without shifting.
- Confirm that the storage latch is secure before leaving the vacuum parked.
This routine helps protect moving parts and reduces strain on the neck and hinge area. Taking a moment to lock it properly is a simple way to maintain your vacuum and support safe storage.
Save Floor Space
Why let your vacuum take up extra floor space when a secure upright position keeps it safer and your storage area neater? When the upright lock is engaged, place it in a closet corner, utility room, or cabinet so your home feels orderly and easy to share. You create space saving storage without blocking walkways or crowding other essentials.
That upright setup also makes daily routines smoother. You can slide the vacuum into a narrow spot, keep nearby tools within reach, and leave more open room for the items your household uses together.
If your model supports it, consider wall mounted vacuum options for added flexibility. These setups lift the machine off the floor and help your storage area feel intentional, welcoming, and ready for everyone who calls your place home.
Prevent Tipping Damage
Saving floor space helps, and it also protects your vacuum from accidental falls. If your model locks in an upright position, use that feature every time. You can keep the body balanced, protect the brush roll, and make storage safer for everyone in your home.
- Make sure the handle clicks fully into place before you walk away.
- Park it beside a wall, or install a nearby hook with wall anchors for extra support.
- If you store it in a cabinet, add anti-tip brackets so shelves or nearby items can’t shift onto it.
- Keep hoses, wands, and tools tucked in neatly, because loose parts can pull the vacuum off balance.
This simple setup helps your vacuum stay ready, stable, and easier to store as part of a well-organized home.
Store a Cordless Vacuum Properly
Because cordless vacuums have a battery and smaller removable parts, they need a bit more care in storage than a standard model. Start with battery maintenance. If you’re storing the vacuum for an extended period, leave the battery at about 50% charge. Follow good charging habits, and don’t keep it plugged in continuously unless the manufacturer says that’s safe. If the battery is removable, store it separately in a cool, dry place.
Next, empty the dustbin, clean the filters, and wipe down the body so the vacuum is clean and ready for the next use. Then place the vacuum or wall dock in a cool, dry closet or utility area, away from heat and direct sunlight.
Keep tools, wands, and brush heads together so nothing gets lost and the full setup stays organized.
Store a Canister Vacuum Correctly
For a canister vacuum, proper storage starts with keeping the main body, hose, wand, and tools clean, dry, and neatly arranged so nothing gets strained or lost. This helps keep the vacuum ready for the next cleanup and makes your home feel more organized.
- Empty the dustbin or replace the bag, then clean the filters and wipe the exterior.
- Choose a cool, dry closet or utility area to protect the parts and preserve canister mobility.
- Store the hose carefully by looping it loosely and keeping the wand beside it.
- Wrap the cord without sharp bends, and keep tools together in a bin or onboard compartment.
If your model separates easily, store each piece close together. This creates a simple system that feels tidy, dependable, and easy to maintain as part of your everyday routine.
Store an Upright Vacuum Correctly
An upright vacuum needs a slightly different storage setup than a canister model, because its taller frame, brush roll, and handle can take more strain if you leave it in the wrong position. Set the vacuum fully upright, lock the handle, and make sure it stands firm. That simple step supports upright vacuum balance and helps protect the base.
Next, check the cord and onboard tools so nothing hangs loose or pulls the unit sideways. Wrap the cord neatly on its hooks, secure attachments, and keep the hose settled in place. If your model allows it, use a wall hook or support point to improve vertical storage safety without forcing the frame.
This keeps your vacuum ready, stable, and easy to grab, which makes your cleaning routine smoother and more reliable every time.
Avoid Heat, Humidity, and Cramped Spots
While it may seem convenient to tuck your vacuum into any open corner, heat, humidity, and cramped storage areas can shorten its lifespan faster than expected. If you want your home-care tools to stay dependable, store your vacuum in a space where it has airflow and remains stable.
- Choose a climate-controlled indoor area instead of a garage, attic, or damp basement.
- Keep it away from radiators, water heaters, sunny windows, and laundry steam.
- Leave enough space around it so the hose, cord, and main body don’t become bent or compressed.
- Use proper ventilation to prevent moisture from lingering around the machine.
A little extra care helps keep your vacuum ready for the next cleaning session, just like the rest of a well-maintained home.
This isn’t being overly cautious. It’s a practical way to protect a tool your household relies on every week.
Protect a Vacuum in Long-Term Storage
Before storing your vacuum for an extended period, empty the dustbin or replace the bag, clean the filters if necessary, and confirm that all parts are completely dry.
Cover the vacuum with a breathable cloth and place it in a cool, dry location to help prevent damage from dust and moisture.
If possible, store it upright and off the floor to help maintain its shape and protect key components.
Clean And Dry
Clean and Dry
Dust and hidden moisture can quietly damage a vacuum over time, so begin by cleaning it thoroughly and allowing every part to dry completely.
This simple step helps keep your vacuum ready for use and prevents musty odors later.
- Empty the dustbin or replace the bag, so debris doesn’t remain inside.
- Wash or clean the filters as directed, then let them dry fully before reassembling the vacuum.
- Wipe the body, hose, and attachments to remove hair, grime, and residue.
- Inspect each cleaned part for remaining moisture, especially around seams, filter housings, and tight corners.
Before storage, make sure nothing feels damp. If your model includes specific care instructions, follow the manual. Proper preparation helps keep your vacuum clean, fresh, and ready for your home.
Cover And Elevate
Once your vacuum is clean and fully dry, protect it from dust and accidental damage by covering it lightly and storing it off the floor when possible.
A breathable cover works best because it blocks dust without trapping hidden moisture. This simple layer helps your vacuum stay fresh, clean, and ready to use again.
If possible, store it on a wall hook, sturdy shelf, or storage rack. Keeping it elevated protects the base from damp floors, scuffs, and bumps from shoes, boxes, or foot traffic.
Store it upright when you can so the parts keep their shape and the weight stays balanced. Keep the area around it open as well, because crowded spaces can lead to tangles and accidental knocks.
When your vacuum has a safe, protected place, it remains ready to support a smooth-running home.
Store Your Vacuum for Easy Access
Store your vacuum where it’s easy to reach, so cleaning takes less effort each week. Choose a spot with clear visibility and enough room for safe storage. When your vacuum is stored in a convenient place, daily routines feel simpler and more manageable.
- Pick a cool, dry closet or utility room near high traffic areas.
- Keep it upright and clear of clutter that could block access.
- Store the hose, wand, and tools together, so every part stays in one place.
- Leave enough open space to remove the vacuum without shifting other items.
This setup keeps you ready for quick cleanups. It also helps your home feel organized, well maintained, and welcoming.
Frequently Asked Questions
How Often Should I Replace My Vacuum Cleaner Filters?
You should replace vacuum filters every 3 to 12 months, depending on usage, filter type, and manufacturer guidance. Follow your maintenance schedule, check filters monthly, and make replacement part of the routine that helps keep your home fresh.
Can Storing a Vacuum Affect Its Suction Performance?
Yes, poor storage can reduce your vacuum’s suction. To protect performance, avoid humid storage areas, keep the filters clean, empty debris regularly, and prevent damage to the cord or hose. With proper storage and maintenance, your vacuum will stay reliable.
Should I Repair Small Vacuum Issues Before Putting It Into Storage?
Yes, you should handle minor fixes before storage, and you are right to ask. A quick pre-storage check helps protect performance, prevent bigger problems, and keep your vacuum ready for next time.
What Signs Indicate Pest Damage Inside a Stored Vacuum?
Signs of pest damage in a stored vacuum include chewed debris, nesting materials, droppings, foul odors, gnawed wires, and musty contamination inside the hoses, filters, or dustbin. Inspect it regularly to keep your vacuum reliable and ready for use.
How Do I Prepare a Vacuum for Moving or Relocation?
Unplug the vacuum first. Remove and dispose of the vacuum bag if needed, then clean and fully dry the unit. Detach any loose parts and keep all attachments together. Wrap the power cord loosely to prevent damage, then cushion the vacuum and its accessories securely so everything stays organized during the move.
